Adding VSCode to Anaconda Enterprise#
You can install VSCode as an optional component of Anaconda Enterprise. Technically, the stock Microsoft version of VSCode will not run in a browser-based environment, so Anaconda relies on code-server, a patched version of VSCode that allows it to be run in the browser.
Note
Anaconda recommends installing VSCode during a scheduled maintenance interval to prevent users from creating new sessions during installation. Existing sessions or deployments do not need to be halted.
Installing VSCode#
Download the VSCode tarball file.
Open a browser and log in to Anaconda Enterprise as the
anaconda-enterpriseuser.Open any existing project and view its settings.
If necessary, change the Default Editor to JupyterLab.
Open a project session.
Upload the VSCode tarball you just downloaded into the project.
Open a terminal for your session.
Unpack the tarball you just downloaded into the tools directory by running the following command:
tar xzvf vscode.tar.gz -C /tools
Enabling VSCode as an editor option#
Once you have unpacked the tarball, you must enable VSCode as an editor option for project sessions.
Access your Kubernetes cluster resource management console.
Open the
anaconda-enterprise-anaconda-platform.ymlConfigMap file.Find the
vscode:section of the file.Change the
hidden:value fromtruetofalse.Save your work and close the file.
Restart the UI pod by running the following command:
kubectl get pods | grep 'ap-ui-\|ap-workspace-\|ap-deploy-' | cut -d' ' -f1 | xargs kubectl delete pods
Removing VSCode as an editor option#
Access your Kubernetes cluster resource management console.
Open the
anaconda-enterprise-anaconda-platform.ymlfile.Find the
vscode:section of the file.Change the
hidden:value fromfalsetotrue.Save your work and close the file.
Restart the UI pod by running the following command:
kubectl get pods | grep 'ap-ui-\|ap-workspace-\|ap-deploy-' | cut -d' ' -f1 | xargs kubectl delete pods
Verifying your installation#
Return to Anaconda Enterprise in your browser and navigate to the projects grid.
Create a new project.
Open your project and view its settings.
Open the Default Editor dropdown menu and select Visual Studio Code.
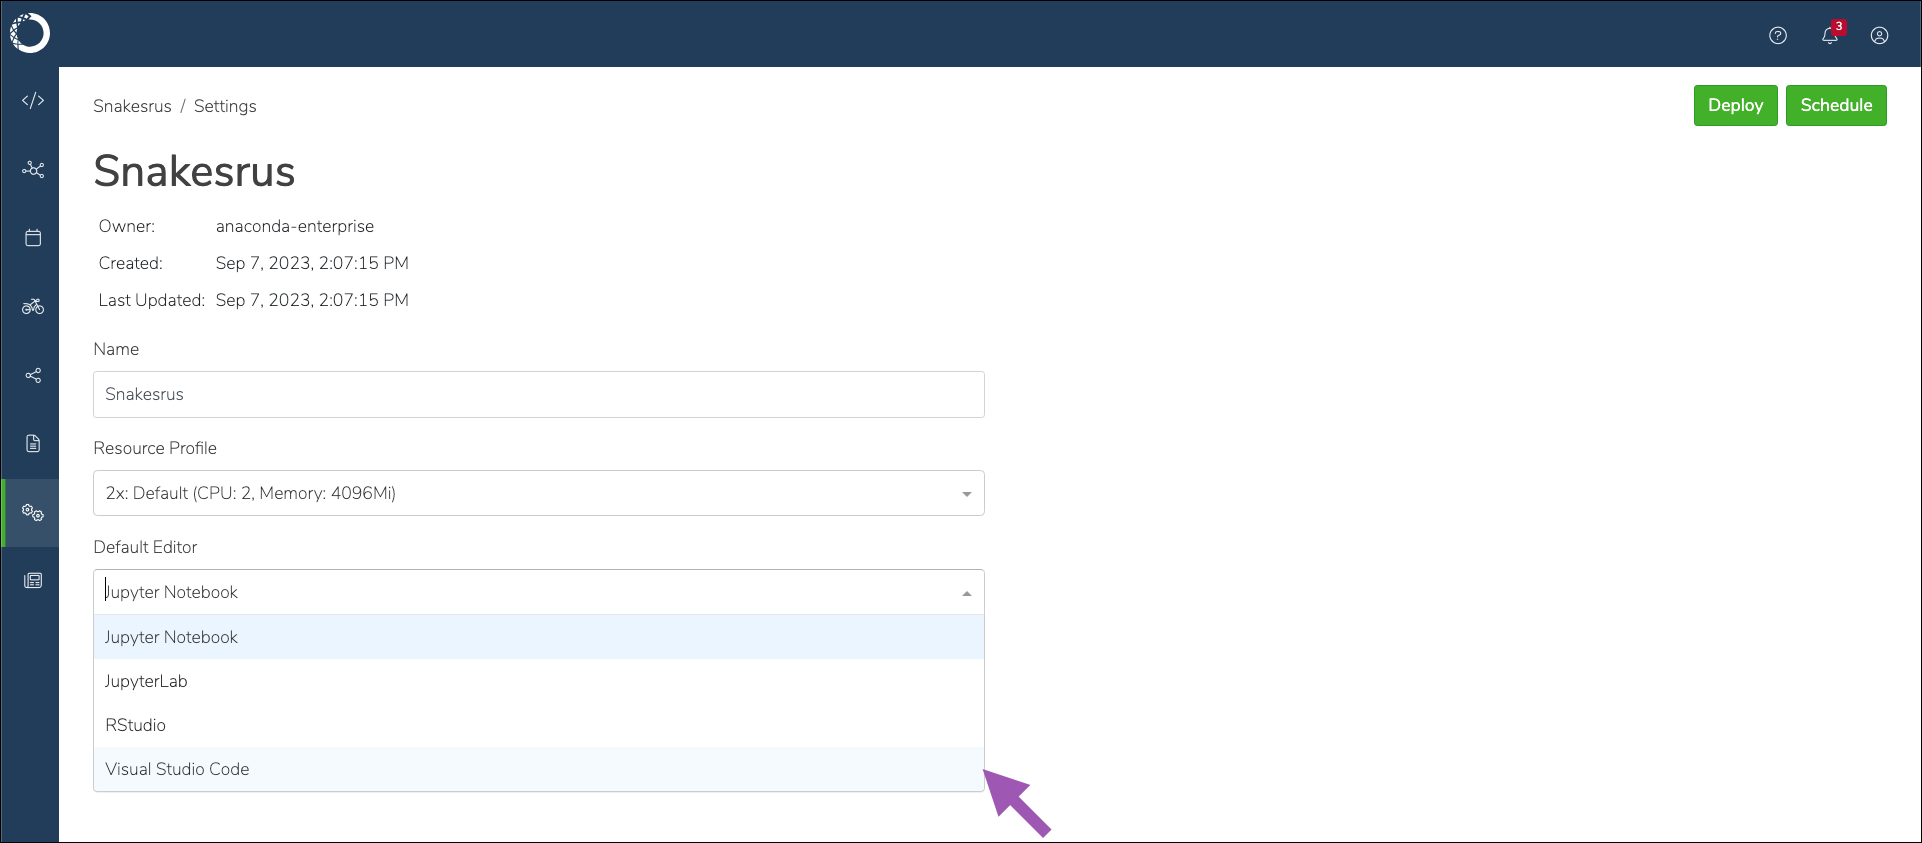
Click Save.
Open a session for your project.

Uninstalling VSCode#
To completely remove VSCode from your instance of Anaconda Enterprise:
Stop any existing project session that is currently using VSCode. These sessions must also choose a different default editor, such as JupyterLab.
Caution
If you do not choose a different default editor, sessions will fail to open from these projects.
Access your Kubernetes cluster resource management console.
Open the
anaconda-enterprise-anaconda-platform.ymlfile.Search for the
/tools:portion of thevolume:section.Remove the
/vscode:portion of the file.
Upgrading to a new version of Anaconda Enterprise#
Upgrading Anaconda Enterprise will not affect the VSCode installation. However, the upgrade process will re-hide VSCode as an editor option. For more information, see Enabling VSCode as an editor option.
Updating the VSCode installation#
Anaconda recommends performing a fresh installation if you need to upgrade VSCode, as this minimizes the risk of unexpected issues.
Stop any existing project session that is currently using VSCode.
Download the latest VSCode installation project and save it locally.
Open a browser and log in to Anaconda Enterprise as an administrator with managed persistence permissions.
Tip
The anaconda-enterprise user account has these permissions.
Open a session for your VSCode installation project.
Open a terminal in your session.
Move the existing VSCode installation aside in case you need it by running the following command:
mv /tools/vscode /tools/vscode.old
Tip
If an error occurs, you can restore this file to avoid downtime.
Remove the directory by running the following command:
rm -r /tools/vscode
Upload your new VSCode tarball file to the project.
Install VSCode by running the following command:
bash install_vscode.sh
Verify your installation by running the following command:
bash /tools/vscode/start_vscode.sh
If your command returns an “address already in use” error, your installation was successful.
Remove the /tools/vscode.old directory once the update is complete.
rm -rf /tools/vscode.old
Installing VSCode extensions#
Anaconda relies on the Open VSX Registry as a source for VSCode extensions.
Installing an extension into a project#
Open a session in your project using the VSCode editor.
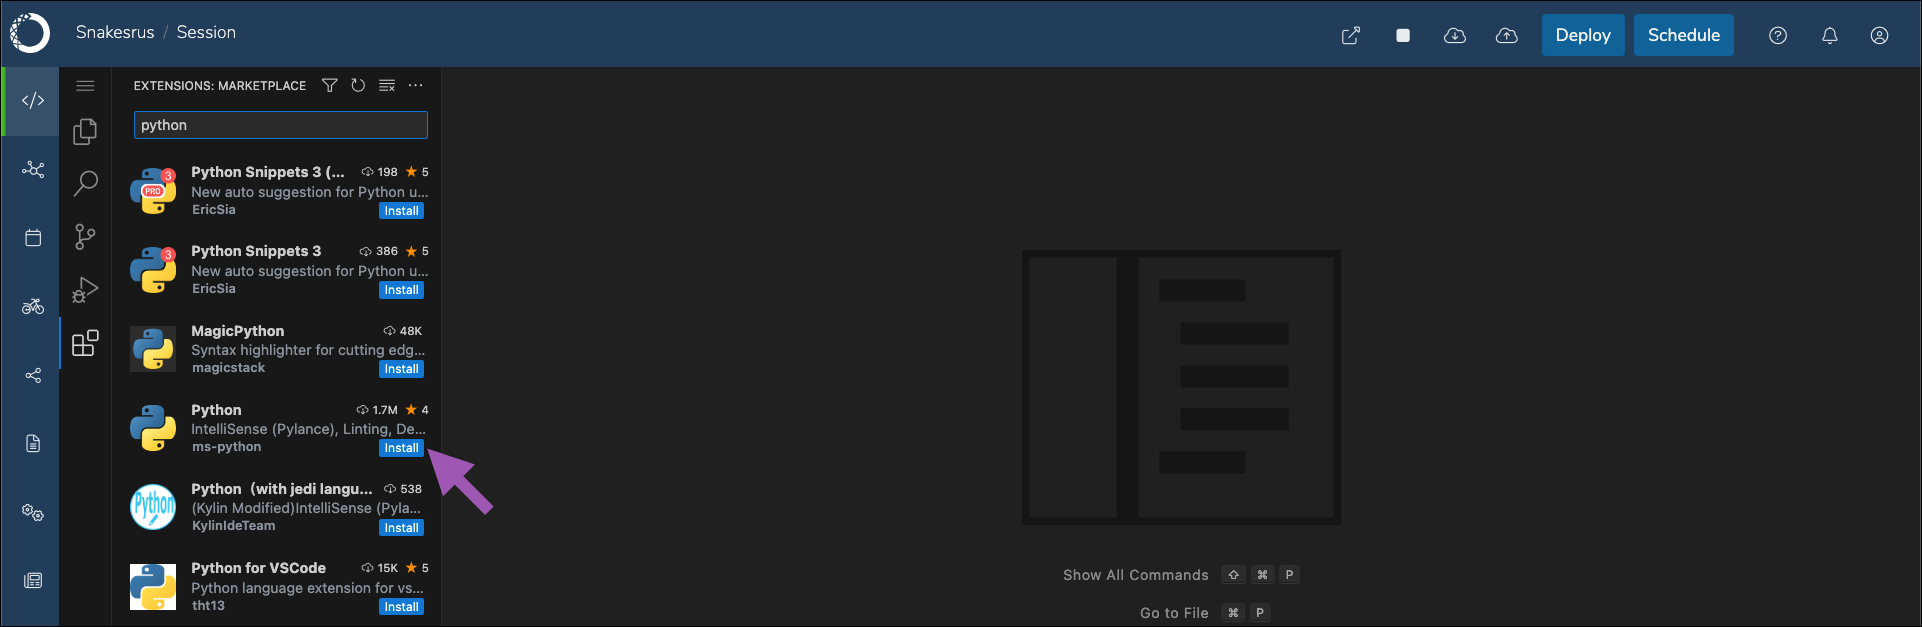
Click the extensions
 icon in the left-hand navigation.
Enter an extension’s name in the search field.
Click Install next to the extension you want.
If you do not have a connection to the registry, you will need to obtain the extension’s .vsix file manually, then upload it to the project you want to use it in.
Installing an extension manually#
Open a browser and log in to Anaconda Enterprise as an administrator with managed persistence permissions.
Tip
The anaconda-enterprise user account has these permissions.
Open a project session using the VSCode editor.
Upload your
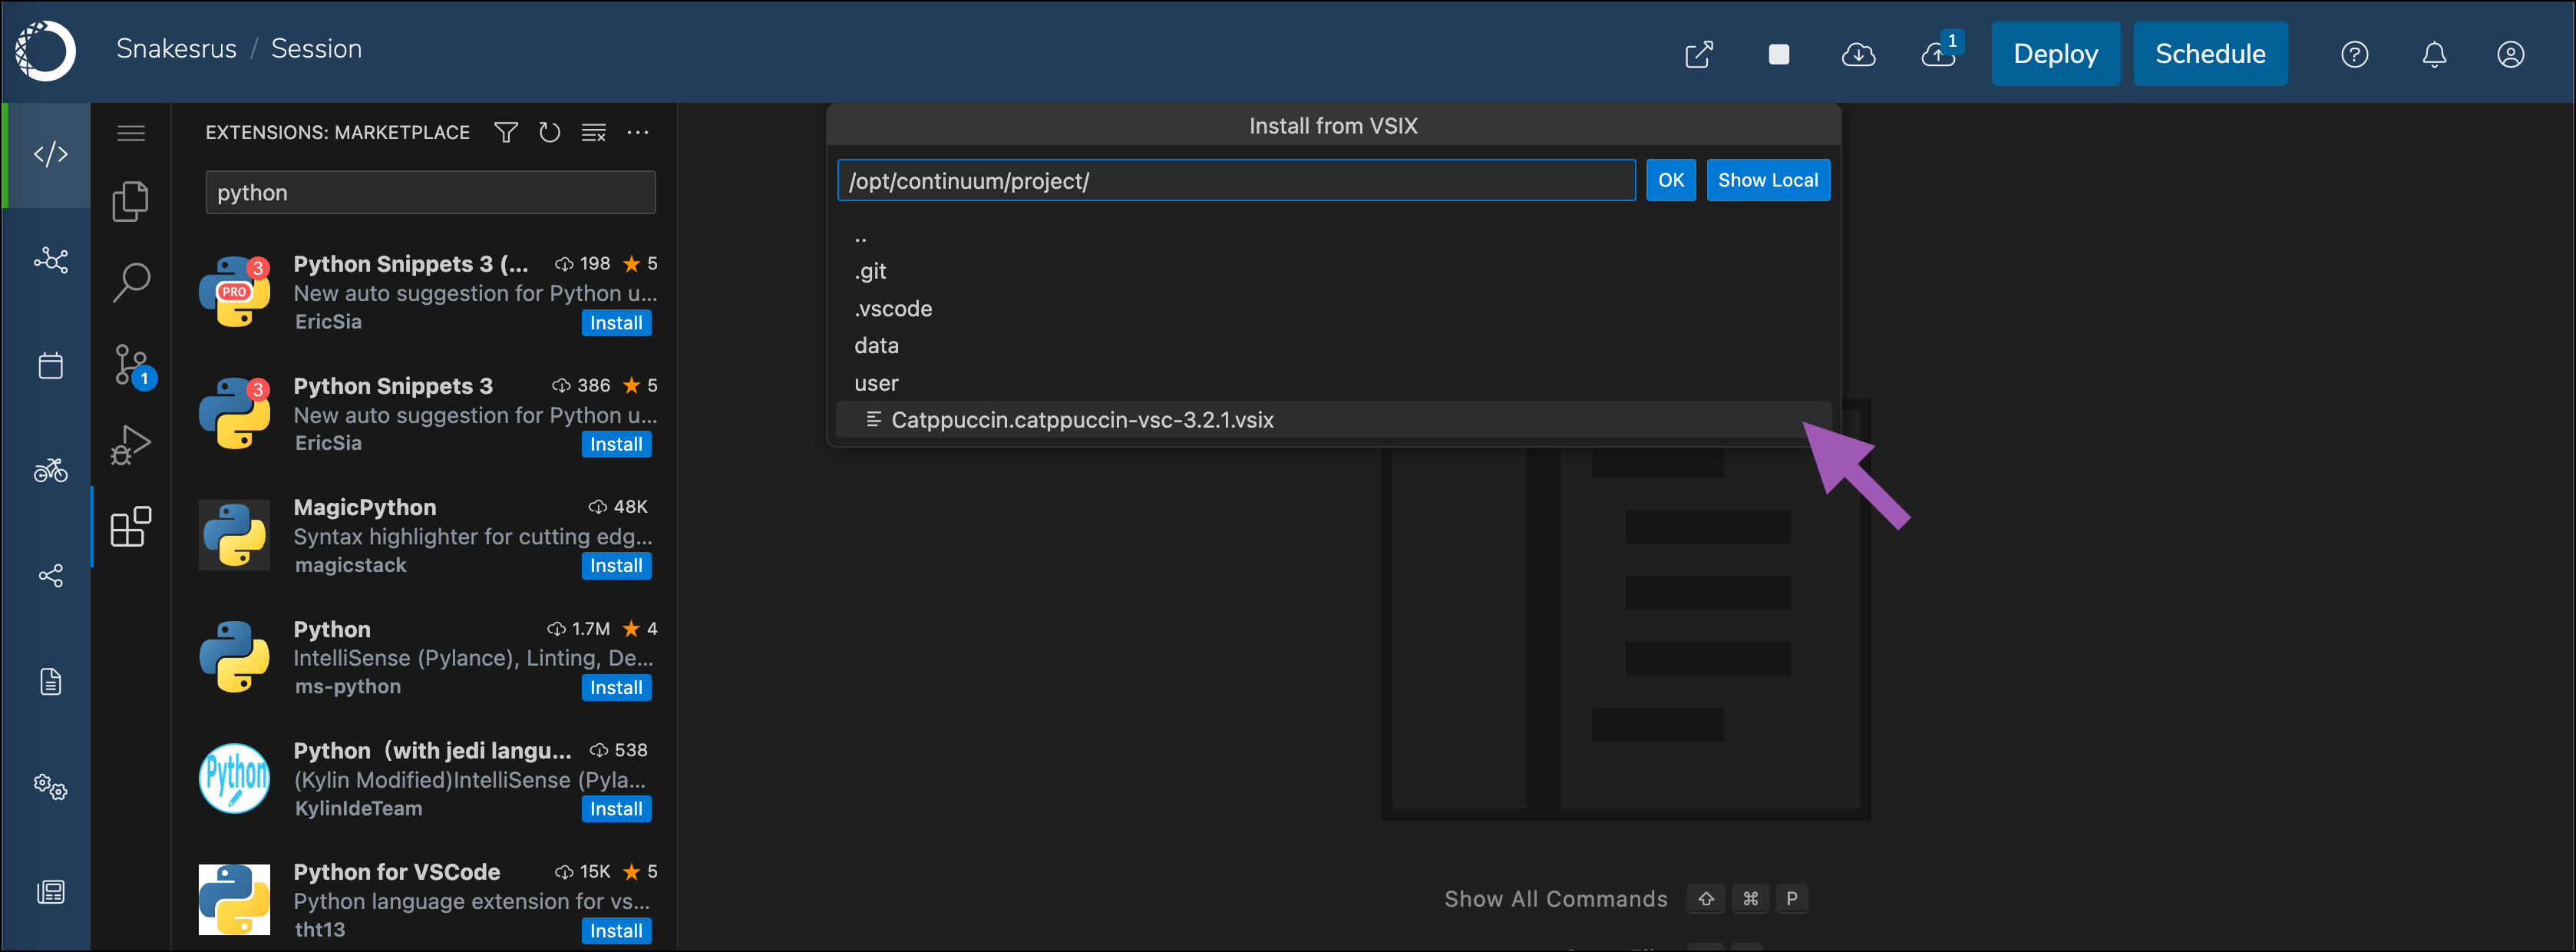
.vsixfile to the project.Click the extensions
icon in the left-hand navigation.Click the more actions
 icon, then select Install from VSIX….
Navigate to
/opt/continuum/project/and select your extension from the list.